Midjourney is an AI-powered tool that revolutionizes how we create images. Accessible through both Discord and a dedicated website, this platform offers endless possibilities for generating unique and creative visuals. However, mastering its features and specific commands is essential to fully leverage its potential.
What is Midjourney?
Midjourney is an image creation platform powered by artificial intelligence, perfect for those who can’t find what they need on traditional image libraries or want to push the boundaries of their creativity. With AI, you can generate unique visuals based on precise descriptions. This tool is particularly useful for creatives, marketers, or anyone looking to produce original content in record time, with limitless creative possibilities.
Using Midjourney via Discord
Initially, Midjourney was only available on its dedicated Discord server. To use it, you need to create a Discord account, join the Midjourney server, and subscribe to a Midjourney plan (with the /subscribe command, which we explain further in this article). The “newbies” channels are specifically designed for new users. Once you’ve joined one, you can start customizing your image generation settings. If you don’t have a Pro subscription, your creations will remain visible to everyone in these public channels. To set up your preferences, type the /settings command in the Newbies channel and choose the options that suit you, such as image quality, generation mode, and more. Once your settings are configured, you can create your first image by typing the /imagine command in the chat window. You’ll then need to describe the image you want to generate in detail. Be sure to check the image generation techniques section later in the article to get the most out of your prompts.
Using the Midjourney website
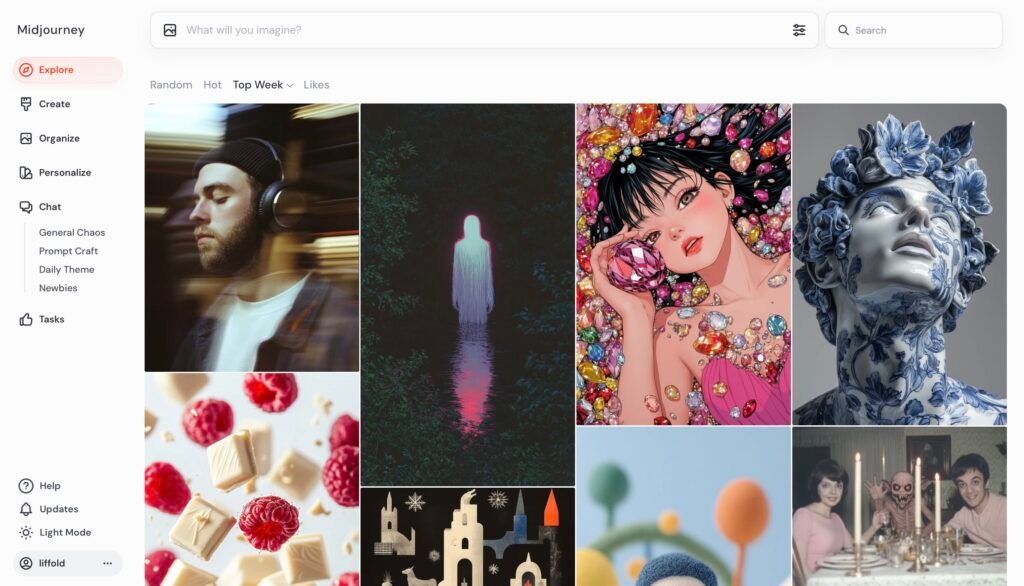
The Midjourney website simplifies the user experience, eliminating the need for a Discord account. You can create an account directly on the site and subscribe to a plan. Once logged in, you’ll see several tabs on the left:
- Explore: This tab lets you discover examples of content generated by the community.
- Create: Your personal space where you can generate and store all your visuals.
- Chat: You also have access to chat rooms, such as Newbies, similar to Discord.
On the site, you don’t need to use the /imagine command like on Discord. You can simply type your prompt into the dedicated generation bar. Additionally, some commands become less necessary thanks to a settings panel where you can easily adjust format, generation mode, and other parameters.
Prompts
The key to using Midjourney effectively lies in writing the best prompts. It’s important to note that you should use English for optimal results. A prompt is the description you provide to the AI to guide the creation process. Unlike a regular request for an image, prompts need to be much more precise to maximize control over the generated image. In Midjourney, prompts are broken down into tokens, which represent each key word or concept in your description. The AI uses these tokens to generate the image. The more detailed the prompt, the closer the result will be to your vision. If you leave elements vague or omit details, the AI may take creative liberties that might not align with what you want. For example, if you want a wooden table in your image, it’s essential to specify “wooden table” instead of just “table,” as the latter could be interpreted in unexpected ways (metal, plastic, etc.). If you want four people, clearly state “four people” instead of just “people” to avoid variations in the number.
Consider specifying:
- Subject: Person, animal, object, etc.
- Image type: Photo, illustration, painting, etc.
- Colors: Bright, dark, monochrome, etc.
- Environment: Forest, street, beach, village, metropolis, etc.
- Lighting: Natural light, dark ambiance, cool lighting, etc.
- Mood: Calm, relaxed, angry, mysterious, etc.
- Other details: Specific elements like a cloudy sky, vintage objects, or certain textures.
By refining your descriptions, you can take control of the image creation process and avoid surprises.
Essential commands
Midjourney commands start with a slash (/) and allow you to control image generation and interact with the AI. Here are the main commands to know:
- /ask: Allows you to ask the Midjourney bot a question and get a quick response. Ideal for seeking advice or clarification on using tools or settings.
- /blend: Easily combines two images into one.
- /daily_theme: Enables or disables notifications for daily theme updates on the Discord channel, keeping you informed about the creative themes of the day.
- /describe: Sends an image and generates four prompt examples based on it, helping you better understand how to visually describe a concept.
- /docs: Generates a link to Midjourney’s official documentation on the Discord server for quick access to help or reference topics.
- /faq: Provides instant access to the FAQ section of the official Midjourney Discord server, answering common questions about using the bot.
- /fast: Switches to fast mode, speeding up image generation. This mode consumes more credits but allows you to receive your creations faster.
- /help: Displays useful information and basic tips for effectively using the Midjourney bot.
- /imagine: The main command for generating an image. After this command, the AI creates an image based on your prompt.
- /info: Allows you to check your account information, including remaining credits, current jobs, and other useful stats to track your projects.
- /prefer option: Creates or manages custom options, such as default settings for your creations.
- /prefer option list: Displays a list of all your current custom options, making it easier to manage your preferences.
- /prefer suffix: Automatically adds a custom suffix to the end of each prompt, handy for applying recurring settings without retyping them each time.
- /public: Allows Pro subscribers to temporarily switch to public mode so their creations are visible to everyone.
- /relax: Switches to Relax mode, where image generation is slower but doesn’t consume credits, useful if you’re not in a rush.
- /remix: Enables or disables Remix mode, allowing you to create variations of an already generated image via the “Make Variations” button.
- /remaster: Recreates an improved version of an already generated image, refining details or adjusting creative aspects.
- /settings: Opens a settings menu to adjust the AI’s quality, resolution, and other parameters according to your needs.
- /shorten: Analyzes a prompt and suggests ways to shorten it, optimizing your commands for more precise results.
- /show: Uses the ID of an already generated job to regenerate the image or display it again on Discord.
- /stealth: For Pro subscribers, this command makes your creations private, preventing other users from seeing them.
- /subscribe: Generates a personal link to the user’s account page, allowing them to manage their Midjourney subscription.
Parameters for refining your creations
Here are the key parameters to refine your creations in Midjourney. Each parameter starts with two dashes (–) and is added at the end of your prompts to provide further customization. You can also combine them for more detailed results.
- Ratios –-ar: Modifies the image’s aspect ratio, which is 1:1 (square) by default. You can choose ratios like –-ar 16:9 (wide format) or –-ar 4:3 (classic format) depending on your needs.
- Chaos –-c: Adjusts the level of variability between the images generated in a grid. With a low value (close to 0), the images will be very similar. A higher value (up to 100) produces more different images. For example: –-c 20, –-c 80…
- No –-no: Excludes certain elements from your image. For example, if you don’t want dogs in a scene, you would use –-no dog. This parameter is useful for removing specific details.
- Quality –-q: Determines the amount of time the AI spends generating an image, influencing its quality. The higher the value, the more detailed the image will be, but it will cost more credits. By default, the quality is set to 1. You can adjust it to –-q 0.25, –-q 0.5, or –-q 2 to increase or decrease the quality.
- Repeat –-r: Repeats the command generation several times. Example: –-r 2, –-r 5, etc.
- Stop –-stop: Stops the image generation process at a certain point. If you use –-stop 50, the image will stop at 50% completion. This is ideal for achieving more abstract results.
- Stylize –-s: Controls the level of artistic interpretation the AI applies to your image. The higher the value (up to 1000), the more artistic the image will be. Examples: –-s 200, –-s 750.
- Style –-style: Defines the general visual style of the image. You can choose styles like –-style original (classic), –-style expressive (creative freedom), or –-style scenic (natural scenes), among others.
- Tile –-tile: Generates a repetitive image, ideal for creating patterns or textures. Use –-tile if you want your creation to be used as wallpaper, background, etc.
- Version –-v: Midjourney constantly evolves. Use this parameter to select a specific version of the AI. For example: –-v 5.2 (the latest), –-v 5.1, or even an older version like –-v 5.
- Video –-video: Generates short MP4 videos from your prompt, instead of just images. This opens up new creative possibilities.
- Weird –-weird: Explore stranger, more unexpected creations. With values up to 3000, you can generate increasingly “weird” visuals. Example: –-weird 500, –-weird 1000, to add a more original or abstract touch.
By mastering these parameters and commands, you can fully control the style, quality, and outcome of your visuals on Midjourney.